Implementing Basic Authentication using Express and Typescript
Implementing Basic Authentication using Express and Typescript
Do you use express for your backend and curious about building a basic auth using express and Typescript or exploring to adapt Typescript for your application backend? Then, you’re in the right place. I often see most of the tutorial recommends frameworks like NestJS. But, An important thing to keep in mind is to learn the basics and structure before jumping into the framework. So, we are going to build express typescript basic auth
Here, we will start with the essential Typescript concepts and patterns to build our backend system. Of course, it can be opinionated too. But let’s compare them and understand when we need those concepts.
Before getting into the content, the whole tutorial is split into series to explain it in detail.
- Project Structure, Database Connection, and Error Handling - Part 1
- Authentication System using Express and Typescript - Part 2
Setting up Express and Typescript is simple and straightforward. There are a lot of articles and documentation are available for initial setup. Check this out.
Project Structure
Once you set up the basic skeleton for the application. It’s time to understand the project structure. Here, we are going to follow a modular system.
Let’s say that our application has User and project API. So we are going to create a User and Project directory and group them based on it.
We can group all the helpers and common functionalities under the Common directory. It helps us to separate the logic, which comes in handy when the application grows.
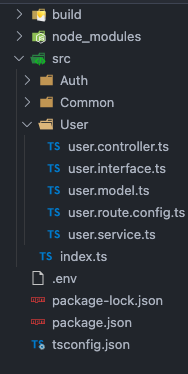
Here’s the finalized version of our project structure.
Each module will contain different files that perform functionality. They are,
Route Configuration - It handles all the routes for the particular module. For example, if we have a user module. It handles all the GET, POST, PUT for the user module.
Controller - It manages the business logic for each endpoint. It can be fetching the users, updating the user details, etc.
Services - It handles the connection with database models and performing queries, and return that data to Controller.
Model - Here, we define our mongoose schema, which is an ODM for MongoDB. We can also use sequelize to handle Postgres, MySQL.
Interface - it helps us to define custom data types.
Route Configuration
We can configure routes in many different ways. However, since we use Express and Typescript, we will go with Typescript concepts for a more structural codebase.
Every module will have routes for its functionality. So, the structure will be the same for all the modules. To restrict the same standard across our codebase, we will use an abstraction pattern with Typescript.
Implement an abstract class with an abstract method for route configuration,
import express, { Application } from "express";

export abstract class RouteConfig {
  app: Application;
  name: string;
  constructor(app: Application, name: string) {
    this.app = app;
    this.name = name;
    this.configureRoutes();
  }

  getName() {
    return this.name;
  }

  abstract configureRoutes(): Application;
}
Here, we have properties such as app , name, and an abstract method.
app - it contains the Express Application Instance
name - it defined the route config name. For example, User Route Config.
configureRoutes - this is where all the classes will implement the router for a module.
Every class that inherits this abstract class must implement configureRoutes method. In that way, we will know it follows a standard.
Let’s create a route config for the User module,
import { RouteConfig } from "../Common/common.route.config";
import express, { Application, Request, Response } from "express";
import UserController from "./user.controller";

export class UserRoutes extends RouteConfig {
  constructor(app: Application) {
    super(app, "UserRoutes");
  }

  configureRoutes() {
    this.app.route(`/users`).get([UserController.getUsers]);

    return this.app;
  }
}
An important thing to note here is configureRoutes. Here, we have our route implementation. it may be different for developers who used app.get() and app.post(). But, We use app.route().
It provides an instance of a single route with which we can handle HTTP verbs with middleware. It mainly helps to group the route HTTP’s based on the name. For example, we can group all the GET, POST, PUT requests of route users. We can also pass middleware to that particular route.
We define GET request for route,
this.app.route(`/users`).get([UserController.getUsers]);Controller for the User is simple and straight forward. It will be something like,
import { Request, Response, NextFunction } from "express";
class UserController {
  constructor() {}

  async getUsers(req: any, res: Response, next: NextFunction) {
    return res.status(200).json({
      success: true,
      data: [
        {
          name: "John",
        },
        {
          name: "Steve",
        },
      ],
    });
  }
}

export default new UserController();
Once you create routes and Controllers, you can add them in index.ts. Next, we instantiate each module route and serve them in the entry file.
import { RouteConfig } from "./Common/common.route.config";
import { UserRoutes } from "./User/user.route.config";

const routes: Array<RouteConfig> = [];

routes.push(new UserRoutes(app));
index.ts after the changes,
import express, { Express, Application, Request, Response } from "express";
import * as http from "http";
import cors from "cors";
import dotenv from "dotenv";
import { RouteConfig } from "./Common/common.route.config";
import { UserRoutes } from "./User/user.route.config";
const routes: Array<RouteConfig> = [];
const app: Express = express();
dotenv.config({});
app.use(express.json());
app.use(cors());
const PORT = process.env.PORT || 8000;
if (process.env.DEBUG) {
process.on("unhandledRejection", function (reason) {
process.exit(1);
});
} else {
}
routes.push(new UserRoutes(app));
app.get("/", (req: Request, res: Response) => {
res.send("Welcome world");
});
const server: http.Server = http.createServer(app);
server.listen(PORT, () => {
console.log(`Server is running on ${PORT}`);
routes.forEach((route: RouteConfig) => {
console.log(`Routes configured for ${route.getName()}`);
});
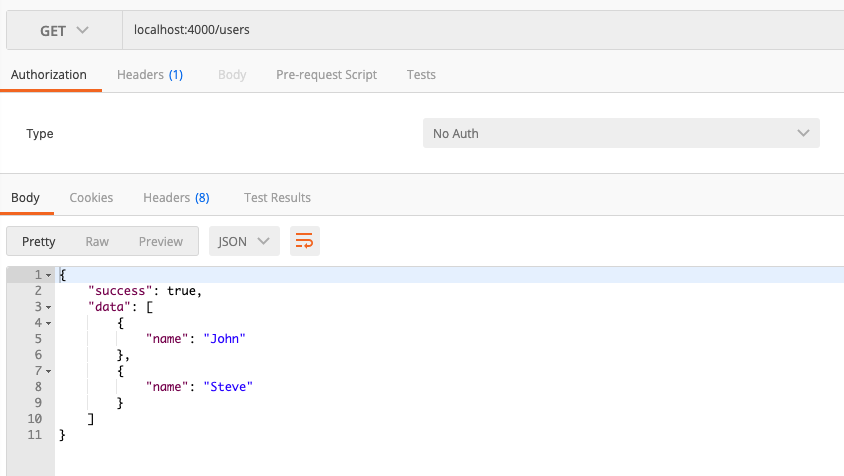
});So far, we have a basic setup for route and Controller. If you run the application, you can see the application running,
Database Connection
Before implementing the connection to the database, we need to install the required dependencies for it.
npm i mongoose debug
npm i --save-dev @types/mongoose @types/debug
We all know the use of Mongoose. If you’re new to Mongoose, you can learn the basics here. We also install debug package. It helps us to log all the debug in the console. It’s better than console.log
Let’s connect MongoDB with the application. Create directory services and mongoose.services.ts and add the following code,
import mongoose from "mongoose";
import debug, { IDebugger } from "debug";

const log: IDebugger = debug("app:mongoose-service");

class MongooseService {
  private count = 0;
  private mongooseOptions = {
    useNewUrlParser: true,
    useUnifiedTopology: true,
    useCreateIndex: true,
    serverSelectionTimeoutMS: 5000,
    useFindAndModify: false,
  };

  constructor() {
    this.connectWithRetry();
  }

  getInstance() {
    return mongoose;
  }

  connectWithRetry() {
    log("process.env.MONGODB_URI", process.env.MONGODB_URI);
    const MONGODB_URI = process.env.MONGODB_URI || "";
    log("Connecting to MongoDB(Retry when failed)");
    mongoose
      .connect(MONGODB_URI, this.mongooseOptions)
      .then(() => {
        log("MongoDB is connected");
      })
      .catch((err) => {
        const retrySeconds = 5;
        log(
          `MongoDB connection unsuccessful (will retry #${++this
            .count} after ${retrySeconds} seconds):`,
          err
        );
        setTimeout(this.connectWithRetry, retrySeconds * 1000);
      });
  }
}

export default new MongooseService();
connectWithRetry is the main function that connects our application to MongoDB. It also retries the connection after 5 seconds of the failure.
We get an instance of Mongoose using the getInstance method to have a single instance across the application.
Authentication
So far, we have seen Project Structure, Route Configuration, and Database Connection. It’s time to implement Authentication for the application. For Authentication, we need
- Login.
- Signup.
- User route to get the logged-in user.
Since Authentication is a workflow itself, we can create a separate module and write logic there. So here’s the flow to build Authentication.
- Create User Model - It creates a model with which we can connect with MongoDB
userscollection. - Implement Authentication Route Configuration - route configuration for Auth. i.e.,
loginandsignup - Create Authentication Controller - Controller interacts with services for data fetch and update.
- Build Authentication Service - Service interacts with DB for database operations.
Create user.model.ts and add the following code,
import MongooseService from "../Common/services/mongoose.service";
import { model, Schema, Model, Document } from "mongoose";
import { scrypt, randomBytes } from "crypto";
import { promisify } from "util";
import { IUser } from "./user.interface";
import { Password } from "../Common/services/password";
const scryptAsync = promisify(scrypt);
export interface UserDocument extends Document {
  email: string;
  password: string;
  username: string;
}

interface UserModel extends Model<UserDocument> {
  build(attrs: IUser): UserDocument;
}

const UserSchema: Schema = new Schema(
  {
    email: { type: String, required: true },
    password: { type: String, required: true },
    username: { type: String, required: true },
  },
  {
    toObject: {
      transform: function (doc, ret) {},
    },
    toJSON: {
      transform: function (doc, ret) {
        delete ret.password;
      },
    },
  }
);

UserSchema.pre("save", async function (done) {
  if (this.isModified("password")) {
    const hashed = await Password.toHash(this.get("password"));
    this.set("password", hashed);
  }
  done();
});

UserSchema.statics.build = (attrs: IUser) => {
  return new User(attrs);
};

const User = MongooseService.getInstance().model<UserDocument, UserModel>(
  "User",
  UserSchema
);

export default User;
It may be overwhelming and confusing at the beginning. But let me break it down and explain everything.
First and foremost, Every Mongoose model starts with a schema. So, we define a Schema here.
const UserSchema: Schema = new Schema(
  {
    email: { type: String, required: true },
    password: { type: String, required: true },
    username: { type: String, required: true },
  },
  {
    toObject: {
      transform: function (doc, ret) {},
    },
    toJSON: {
      transform: function (doc, ret) {
        delete ret.password;
      },
    },
  }
);
Every time we send the user data in response. We don’t want to expose the password in response. So to remove it, we implement this toJSON here.
{
    toObject: {
      transform: function (doc, ret) {},
    },
    toJSON: {
      transform: function (doc, ret) {
        delete ret.password;
      },
    },
  }
While users signup, we need to insert that data into DB. In Mongoose, we can implement it in two ways.
- Using
<Model>.createmethod - Using
newkeyword to create an object. For example,new User().
We are going to use a new User to create a user here. But the problem with that approach is, Typescript doesn’t check the type when we create a new User(). So it doesn’t complain even if we change the argument name in it.
new User({
  email: "",
  pass: "", // This should be password. but, we are passing a wrong argument and Typescript doesn't complain.
});
It completely affects the purpose of using Typescript in the application. To fix it, we somehow need to create a method that checks the type before passing it to a new User().
create an interface user.interface.ts and add the following code
export interface IUser {
  email: string;
  password: string;
  username: string;
}UserSchema.statics.build = (attrs: IUser) => {
return new User(attrs);
};So, we create a build method that takes the type of IUser, which is an interface here, and pass it to a new User()
If we try to use User.build in our Controller. Typescript will complain something like this,
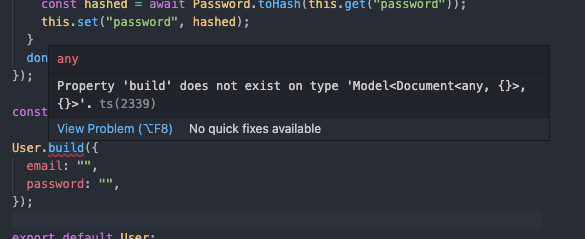
Even though we created a custom method in the Schema, the model Type in Typescript doesn’t know. So, we need to extend Mongoose Model and add this custom method to it.
export interface UserDocument extends Document {
  email: string;
  password: string;
  username: string;
}

interface UserModel extends Model<UserDocument> {
  build(attrs: IUser): UserDocument;
}
That completes the User Model. let’s create Auth route, Controller and services.
auth.route.config
import { Application, Request, Response } from "express";
import { RouteConfig } from "../Common/common.route.config";
import AuthController from "./auth.controller";
export class AuthRoutes extends RouteConfig {
  constructor(app: Application) {
    super(app, "AuthRoutes");
  }

  configureRoutes() {
    this.app.route("/login").post(AuthController.login);

    this.app.route("/signup").post(AuthController.signup);

    return this.app;
  }
}
auth.controller.ts
import { NextFunction, Request, Response } from "express";
import AuthService from "./auth.service";
import jwt from "jsonwebtoken";
import debug, { IDebugger } from "debug";
import { Password } from "../Common/services/password";
const jwtSecret: string = process.env.JWT_SECRET || "123456";
const tokenExpirationInSeconds = 36000;

const log: IDebugger = debug("auth:controller");

class AuthController {
  constructor() {}

  async login(req: Request, res: Response, next: NextFunction) {
    try {
      const email = req.body.email;
      const password = req.body.password;

      const user = await AuthService.findUserByEmail(email);
      log("user", user);
      if (user) {
        const isPasswordMatch = await Password.compare(user.password, password);

        if (!isPasswordMatch) {
          throw new Error("Invalid Password");
        } else {
          log("jwt Secret", jwtSecret);
          const token = jwt.sign(req.body, jwtSecret, {
            expiresIn: tokenExpirationInSeconds,
          });

          return res.status(200).json({
            success: true,
            data: user,
            token,
          });
        }
      } else {
        log("User Not Found");
        throw new Error("User Not Found");
      }
    } catch (e) {
      next(e);
    }
  }

  async signup(req: Request, res: Response, next: NextFunction) {
    try {
      const username = req.body.username;
      const email = req.body.email;
      const password = req.body.password;

      const user = await AuthService.findUserByEmail(email);
      log("user", user);
      if (user) {
        throw new Error("User Already Exists");
      } else {
        try {
          const newUser = await AuthService.createUser({
            username,
            email,
            password,
          });

          const token = jwt.sign({ username, password }, jwtSecret, {
            expiresIn: tokenExpirationInSeconds,
          });

          return res.status(200).json({
            success: true,
            data: newUser,
            token,
          });
        } catch (e) {
          log("Controller capturing error", e);
          throw new Error("Error while register");
        }
      }
    } catch (e) {
      next(e);
    }
  }
}

export default new AuthController();
auth.service.ts
import User from "../User/user.model";
import { IUser } from "../User/user.interface";
class AuthService {
  async createUser(data: IUser) {
    try {
      const user = User.build(data);
      await user.save();
    } catch (e) {
      throw new Error(e);
    }
  }

  async findUserByEmail(email: string) {
    return User.findOne({
      email: email,
    }).exec();
  }
}

export default new AuthService();
Middleware
To validate the user based on the jwt token, create a middleware JWT.ts and add the following code,
import jwt from "jsonwebtoken";
import { Request, Response, NextFunction } from "express";
const JWT_KEY = process.env.JWT_SECRET || "123456";
import debug, { IDebugger } from "debug";

const log: IDebugger = debug("middleware:JWT");

class JWT {
  authenticateJWT(req: Request, res: Response, next: NextFunction) {
    const authHeader = req.headers.authorization;
    if (authHeader && authHeader !== "null") {
      // const token = authHeader.split(" ")[1];
      log("auth Header", JWT_KEY);
      jwt.verify(authHeader, JWT_KEY, (err: any, user: any) => {
        if (err) {
          log("Error", err);
          return res
            .status(403)
            .send({ success: false, message: "Token Expired" });
        }
        req.user = user;
        next();
      });
    } else {
      res.status(403).json({ success: false, message: "UnAuthorized" });
    }
  }
}

export default new JWT();
We get the token from the header and verify it with just. We can use the middleware in the route like,
this.app.route(`/user`).get([JWT.authenticateJWT, UserController.getUser]);Complete source code is available here