Kubernetes for Nodejs developers
Kubernetes for Nodejs developers
Do you keep hearing the word kubernetes in the tech community and you couldn’t understand what,why and how of kubernetes?. Well, you are in the right place my friend. I was like that, when people around me talks about kubernetes and couldn’t understand what they talk about. So, In this article, let’s understand kubernetes with nodejs application development.
Note: there are lot of article out there explains about kubernetes and it’s workflow in detail. but the main purpose of writing this blog is to explain kubernetes to a guy like me who wants to learn kubernetes in easy and understandable way.
Before, getting into the concept of kubernetes. let’s understand what is kubernetes and why it’s so popular nowadays.
I assume that you have basic understanding of what is docker, containers and how to build docker images for nodejs application.
Prerequisites
Docker Desktop installed and kubernetes enabled on your machine.
Related Articles
How to Find Project Ideas for Web development
Building a Production-grade Nodejs,GraphQL and TypeScript Server with CI/CD Pipeline
What is Kubernetes?
Let’s try to understand kubernetes with simple terms and scenario. In the beginning of application development, we tend to deploy our application manually just by creating server in the cloud and deploy our application with either through git or file transfer protocol such as FileZilla.
After the evolution of containers and docker, application deployment will be like wrapping our application code insider docker containers and deploy them in the server. it solved lot of problems for us such as installing the dependancies manually and resolve the conflicts that comes in that way.
Still there are some problems that needs to solved manually. they are, if we have replicas of the containers, we need to manage them. like if one goes down. we need to restart the replica set and keep checking the health of the cluster.
Then comes Kubernetes, which helps us to manage the containers within a system. kubernetes helps us to manage the container in a systematic way. Once configured, it will take care of the containers without you need to worry about the containers.
Some of the benefits of using kubernetes are,
- Service Discovery - Let’s say you have a Container for User REST API and Container for Another domain REST API Container. to make it communicate, you need to make the service available to another one. kubernetes helps us in that process easily. we will see about this in later part of this article.
- Container Orchestration - If you want to replicas of your container to be running all the time irrespective of failure. kubernetes solves that problem out of the box. you don’t need to worry about that at all. it will make sure that specified replica’s available all the time.
Basics of Kubernetes
Alright!! we reached one of the important topics in the article. Let’s see what we need to know in kubernetes before application development with kubernetes.
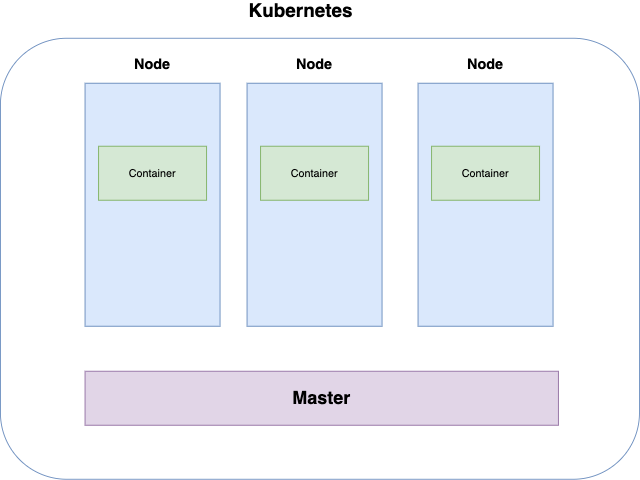
Firstly, we have master and node,
Master & Node
Node is a simply a virtual machine the server. just like how we create a virtual machines. kubernetes manage the VM as node.
Master is a controller which controls all the operations in the node and it also manages all the configurations of nodes.
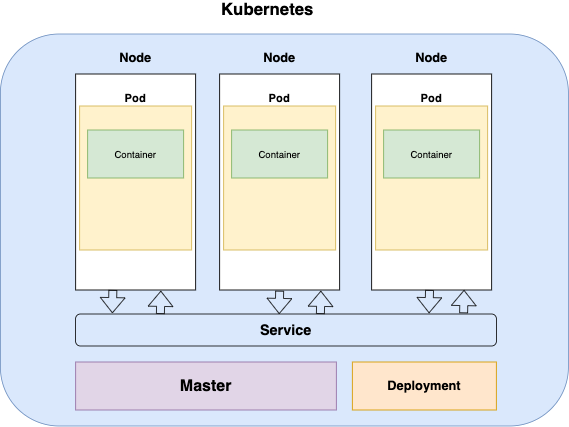
Inside the Node, we have Pod and Container.
Pod & Container
Pod in kubernetes is a collection of containers. most of the time pod will contain only one container. only on some special scenarios, you might need to create multiple containers in the pod.
so far, we have the container inside the pod. but, how do they communicate between the containers. for example, Nodejs application need to connect with mongodb for data access. how does it happen in kubernetes.
There comes the need of Service in kubernetes.
Service
Service helps us for the communication between the containers. Let me tell you one thing. when i read about services in kubernetes. i had this question of “Why?”, Why do we need an another resources to mange the communication. Can’t a container talk directly with another container?.
Then i found out the real purpose of Services in kubernetes. Let’s say you have the Container A with IPAddress 192.16.3.2 and Container B communicates with Container A using this IPAddress. After sometime, your Container A is died and Kubernetes recreates a new container for you on the Node. Now, the IPAddress will be different for the Container. Now, how can ContainerB communicates with A with the IPAddress is different
This is the main purpose of having Kubernetes Service.
Deployment
Deployment is a way to create the pods and container in kubernetes. it read the configuration file and pull the docker images from hub and create the container out of it.
Most of the time, you will be writing the yaml configuration for Service and Deployment Resources**.** Sometimes, you might need to create some other resources.
Running Nodejs with Kubernetes
Here we have a simple nodejs application to deploy using kubernetes. create app.js and add the following code,
const express = require("express");

const app = express();

app.get("/", (req, res) => {
  res.send({
    data: "Kubernetes is Awesome",
  });
});

const PORT = process.env.PORT || 8080;

app.listen(PORT, () => {
  console.log(`Server is running on port ${PORT}`);
});
After that, create a folder to write the kubernetes configuration. infra/app-deploy.yaml
---
apiVersion: v1
kind: Service
metadata:
  name: my-node-app-service
  labels:
    app: my-node-app-service
spec:
  ports:
    - port: 80
      protocol: TCP
      targetPort: 8080
  type: LoadBalancer
  selector:
    app: mynodeapp
---
Let’s break it down one by one. For any resources that you create for kubernetes. it always start with apiVersion and kind
apiVersion: v1
kind: Service
Here, we mention the kind as Service which create the service for us. there are four type of Service in the kubernetes.
- ClusterIP - it exposes the service to be accessed within the cluster. you can access this service using the IPAddress of the cluster.
- NodePort - NodePort helps us to connect Pods to external IP’s. it maps the Node Port with Pod Port which helps to access the Pod externally. Note: Port of Node ranges from 30000 - 32767
- LoadBalancer - it is similar to NodePort except that it balances the load with multiple ports.
- ExternalName - it maps the service and pods to the CNAME record
Here, we will be using LoadBalancer Service to map the NodePort with Containers.
Coming back to the configuration. then we have, metadata which helps to identify the service.
metadata:
  name: my-node-app-service
  labels:
    app: my-node-app-service
After that, we have the main part of the configuration which is spec. Here, we specify the type of service along with the port and target port
spec:
  ports:
    - port: 80
      protocol: TCP
      targetPort: 8080
  type: LoadBalancer
  selector:
    app: mynodeapp
Service WorkFlow
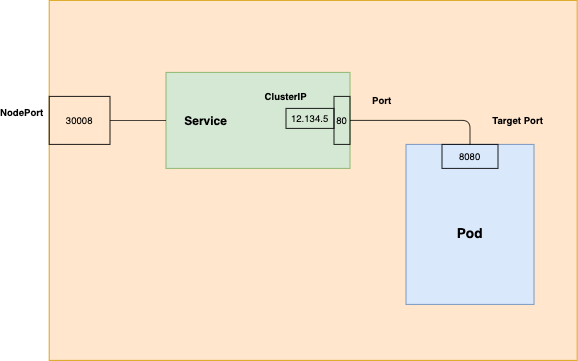
On the above diagram, we need to access the pod from external IP. to do that, we configure Service which maps the port between Pod and NodePort.
Service maps the Port with the targetPort and it maps with NodePort to route the traffic into the Pod.
So far, we have seen how to configure the Service .let’s see how to create the Pods and Containers inside of it. To do that, we need to create Deployment Resources.
apiVersion: apps/v1
kind: Deployment
metadata:
  name: app-deployment
  labels:
    app: mynodeapp
spec:
  replicas: 2
  selector:
    matchLabels:
      app: mynodeapp
  template:
    metadata:
      labels:
        app: mynodeapp
    spec:
      containers:
        - name: mynodeapp
          image: ganeshmani009/nodesample
          ports:
            - containerPort: 8080
          imagePullPolicy: Always
          env:
            - name: PORT
              value: "8080"
            - name: MONGODB_URL
              value: mongodb://mongo:27017/sampledb
This seems to be a bit long. right?. let’s try to break it down and understand better. just like before, we have the basic information about the resource,
# configuration
apiVersion: apps/v1
kind: Deployment
metadata:
  name: app-deployment
  labels:
    app: mynodeapp
After that, we have spec with configuration for the template and replicaSet
# Configuration for the replica set
replicas: 2
  selector:
    matchLabels:
      app: mynodeapp
Then, we have the configuration for pod, which pull the image from the docker hub and create the container inside the pod.
template:
  metadata:
    labels:
      app: mynodeapp
  spec:
    containers:
      - name: mynodeapp
        image: ganeshmani009/nodesample
        ports:
          - containerPort: 8080
        imagePullPolicy: Always
        env:
          - name: PORT
            value: "8080"
          - name: MONGODB_URL
            value: mongodb://mongo:27017/sampledb
Once you complete the configuration, run the command in the terminal.
kubectl apply -f app-deploy.yaml
you can check the pods using the command
kubectl get pods
Since, we configured replicaSet as 2. it creates two pods for us. to check the service.
kubectl get service
Conclusion
we just scratched the surface in the kubernetes world. In upcoming article, we will see how to connect the mongodb with nodejs application in kubernetes. we will also see some use-cases how nodejs and kubernetes used in production. Until then, Happy Coding :-)