Building a Simple Chat with React GraphQL and Hasura effortlessly - Part 1
Building a Simple Chat with React GraphQL and Hasura effortlessly - Part 1
In this article, we will see how to build a chat application concept using react graphQL and Hasura. Building a Chat application with react graphql and Hasura.
Recent Articles,
Building Real time API using graphql subscriptions
TypeScript for React developers in 2020
Building a Piano with React Hooks
Demo
Complete Source code can be found here
Hasura Setup
Hasura is basically used to create a backend in less time. you don’t need to setup a node server develop a graphql from scratch.
Hasura does that part for you. only thing you need to do is, create a postgres tables according to your application requirement.then, Hasura created all the GraphQL Queries,Mutations and Subscriptions for you.
Let’s see how to setup hasura for our chat application. Setting up hasura is so easy on Heroku.
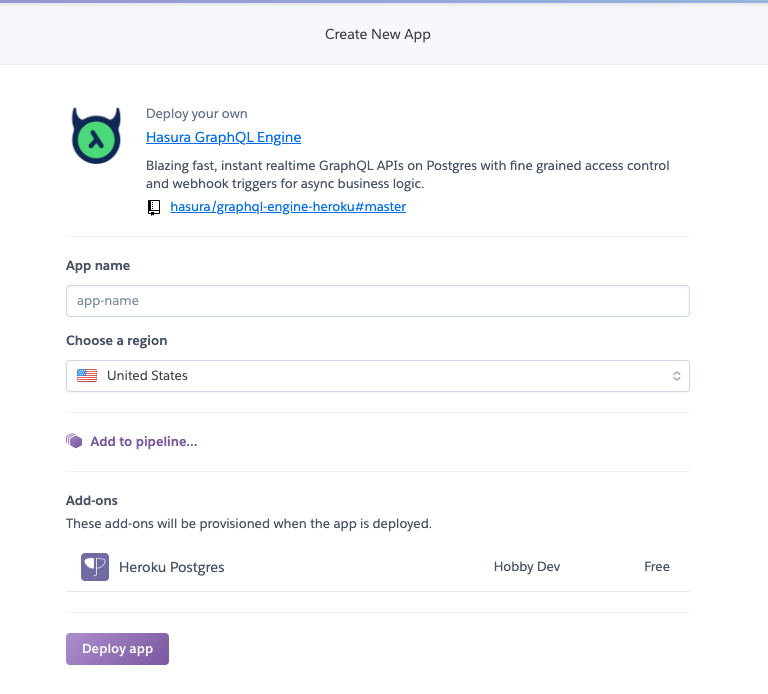
Once you deploy your app in heroku. it will take you to your heroku dashboard.
If you watch it carefully, Postgres database is already installed on your app.
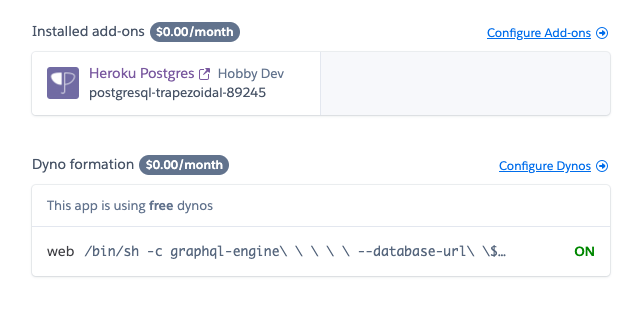
Now it is time to create some postgres tables. click on Open App in your heroku dashboard. it will take you to your hasura console.
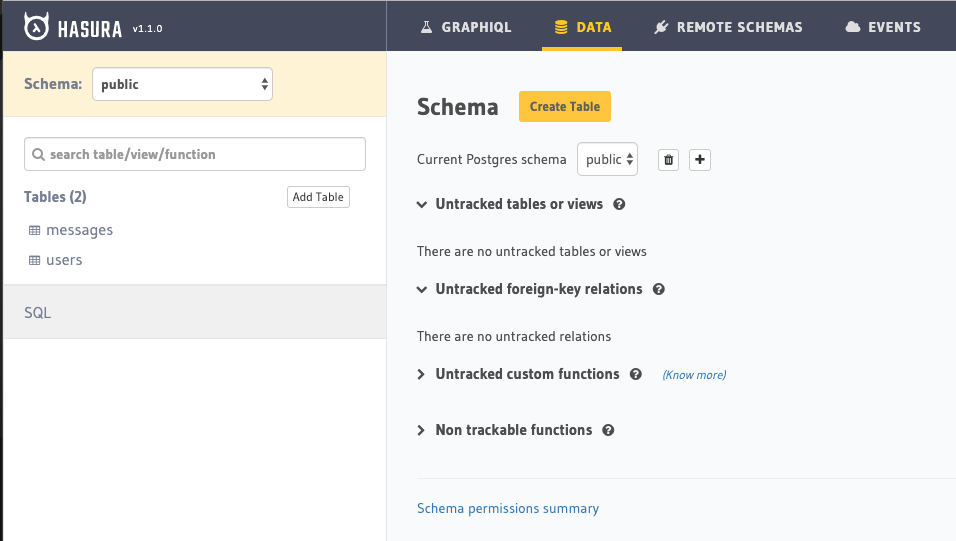
After that, we need to create tables for our application.
- users - create users table to store all the users for our chat application.
- message - message table stores all the messages of our application.
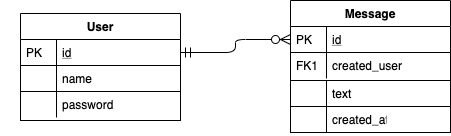
Once you create the tables, Hasura auto generates all the GraphQL Queries,Mutations and Subscriptions for you.
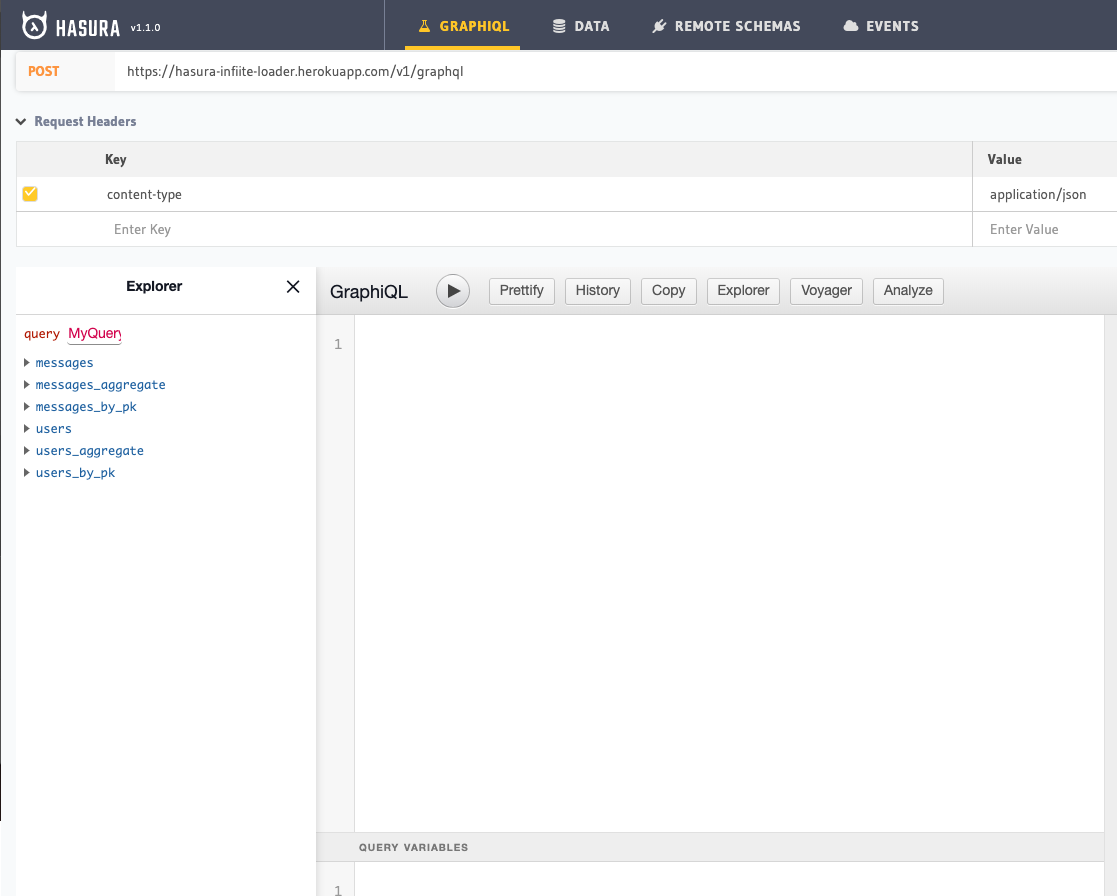
All you need to do is, use mutations and queries to insert and fetch the data from postgres database.
Our application backend work is done. So, easy!!! isn’t it?.
React GraphQL Setup
Let’s see how to setup react graphql for our application.
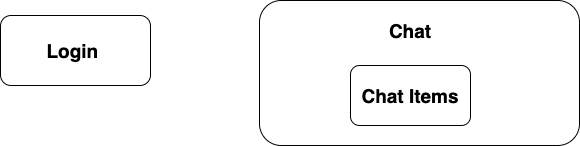
npx create-react-app hasura-chatThink about what are all components that we need for our chat application. Mainly we need a login page and chat elements. since it is a list we need to create a chat item as a component.
- Login - this component renders the login page.
- Chat - it renders the chat items as a list.
- ChatItems - for each item in the chat, it renders the chat items component.
Everything is good so far. but wait, how are we going to handle the api call and data in react.
well, that is where we are going to use GraphQL here. i have to say, i tried two to three solutions for GraphQL. but, i was not satisfied until i found the current solution.
we are going to use Apollo react hooks for our API call. From my learning and experience, it is so far the easiest way to get started with GraphQL on react applications.
Okay. Enough talking. Let’s get started with setting it up.
npm install @apollo/react-hooks apollo-link-ws apollo-link-http apollo-link apollo-utilities apollo-cache-inmemory apollo-boostWow..that’s a lot of packages. Let’s break it down one by one.
- @apollo/react-hooks - it is used to handle all the graphql queries,mutation and subscriptions using react hooks.
- apollo-link-ws - this package is used to connect web socket with our backend.
- apollo-link-http - it is used to connect http with our backend.
- apollo-link - it act as a network interface for graphql request and fetching the result. Here, apollo link is used to split the http and web socket connections.
- apollo-utilities - this package is used get the information of graphql queries.
- apollo-cache-memory - it is used for caching the graphql results.
After that, we need to set it up in our App.js. import all the packages in App.js.
import ApolloClient from "apollo-client";
import { ApolloProvider } from "@apollo/react-hooks";
import { WebSocketLink } from "apollo-link-ws";
import { HttpLink } from "apollo-link-http";
import { split } from "apollo-link";
import { getMainDefinition } from "apollo-utilities";
import { InMemoryCache } from "apollo-cache-inmemory";
create http and websocket link with your hasura graphql endpoint
const httpLink = new HttpLink({
  uri: "https://hasura-infiite-loader.herokuapp.com/v1alpha1/graphql", // use https for secure endpoint
});

// Create a WebSocket link:
const wsLink = new WebSocketLink({
  uri: "ws://hasura-infiite-loader.herokuapp.com/v1alpha1/graphql", // use wss for a secure endpoint
  options: {
    reconnect: true,
  },
});
Then, create a Apollo client for our application.
// using the ability to split links, you can send data to each link
// depending on what kind of operation is being sent
const link = split(
  // split based on operation type
  ({ query }) => {
    const { kind, operation } = getMainDefinition(query);
    return kind === "OperationDefinition" && operation === "subscription";
  },
  wsLink,
  httpLink
);

// Instantiate client
const client = new ApolloClient({
  link,
  cache: new InMemoryCache(),
});
finally, import it in our Apollo Provider
function App() {
  return (
    <ApolloProvider client={client}>
      <ThemeProvider theme={customTheme}>
        <div className="App">
          <Routes />
        </div>
      </ThemeProvider>
    </ApolloProvider>
  );
}
React Components
Like we discussed in the beginning, let’s create react components for our application.

create the components and routes for each components. Here, we have two routes, they are
- /login - renders the Login Flow
- /chat - renders the Chat Component
React Hooks
Here, we use two important react hooks for graphql data fetch/insert. they are,
- useMutation - useMutation is used for GraphQL mutation in our backend.
- useSubscription - Since we are building a real time app, we need GraphQL Subscriptions. useSubscription is used to create a web socket link.
useMutation
we use useMutation hooks in Login Component here. In login/index.js add the following code,
import { useMutation } from "@apollo/react-hooks";
import { gql } from "apollo-boost";
we import useMutation and gql from react hooks and apollo boost to make a GraphQL request.
const LOGIN_USER = gql`
  mutation InsertUsers($name: String!, $password: String!) {
    insert_users(objects: { name: $name, password: $password }) {
      returning {
        id
        name
      }
    }
  }
`;
After that, we create a graphql mutation and store it in a constant LOGIN_USER
Then, inside our login component, define the useMutation react hook.
const [insert_users, { data }] = useMutation(LOGIN_USER);when use clicks the login button, call the insert_users function with required data.
const onSubmit = () => {
  insert_users({ variables: { name: state.name, password: state.password } });
};
it will return the success response. store it in your component state and use it for the next step.
import React, { useState, useEffect } from "react";
import { useForm } from "react-hook-form";
import {
  FormErrorMessage,
  FormLabel,
  FormControl,
  Input,
  Button,
  Box,
} from "@chakra-ui/core";

import { useMutation } from "@apollo/react-hooks";
import { gql } from "apollo-boost";

const LOGIN_USER = gql`
  mutation InsertUsers($name: String!, $password: String!) {
    insert_users(objects: { name: $name, password: $password }) {
      returning {
        id
        name
      }
    }
  }
`;

const Login = ({ history }) => {
  const [state, setState] = useState({
    name: "",
    password: "",
  });

  const [insert_users, { data }] = useMutation(LOGIN_USER);

  useEffect(() => {
    const user = data && data.insert_users.returning[0];
    if (user) {
      localStorage.setItem("user", JSON.stringify(user));
      history.push("/chat");
    }
  }, [data]);
  const { handleSubmit, errors, register, formState } = useForm();

  function validateName(value) {
    let error;
    if (!value) {
      error = "Name is required";
    }
    return error || true;
  }

  function validatePassword(value) {
    let error;
    if (value.length <= 4) {
      error = "Password should be 6 digit long";
    }

    return error || true;
  }

  const onInputChange = (e) => {
    setState({ ...state, [e.target.name]: e.target.value });
  };

  const onSubmit = () => {
    insert_users({ variables: { name: state.name, password: state.password } });

    setState({ name: "", password: "" });
  };

  return (
    <Box>
      <form onSubmit={handleSubmit(onSubmit)}>
        <FormControl isInvalid={errors.name}>
          <FormLabel htmlFor="name">Name</FormLabel>
          <Input
            name="name"
            placeholder="name"
            onChange={onInputChange}
            ref={register({ validate: validateName })}
          />
          <FormErrorMessage>
            {errors.name && errors.name.message}
          </FormErrorMessage>
        </FormControl>

        <FormControl isInvalid={errors.password}>
          <FormLabel htmlFor="name">Password</FormLabel>
          <Input
            name="password"
            type="password"
            placeholder="password"
            onChange={onInputChange}
            ref={register({ validate: validatePassword })}
          />
          <FormErrorMessage>
            {errors.password && errors.password.message}
          </FormErrorMessage>
        </FormControl>
        <Button
          mt={4}
          variantColor="teal"
          isLoading={formState.isSubmitting}
          type="submit"
        >
          Submit
        </Button>
      </form>
    </Box>
  );
};

export default Login;
useSubscription
similary define the useSubscription inside the Chat/index.js to get the data through web sockets.
import { useMutation, useSubscription } from "@apollo/react-hooks";
import { gql } from "apollo-boost";
we import useMutation, useSubscription and gql in the Chat component.
const MESSAGES_SUBSCRIPTION = gql`
  subscription {
    messages {
      id
      text
      users {
        id
        name
      }
    }
  }
`;

const SUBMIT_MESSAGES = gql`
  mutation InsertMessages($text: String!, $userid: Int!) {
    insert_messages(objects: { text: $text, created_user: $userid }) {
      returning {
        text
        created_user
        users {
          name
          id
        }
        id
      }
    }
  }
`;
Here, we have two graphql request. one is for Mutation and another one is for subscription.
After that, define the hooks in Chat component.
const [insert_messages, { returnData }] = useMutation(SUBMIT_MESSAGES);

const {
  loading,
  error,
  data: { messages } = [],
} = useSubscription(MESSAGES_SUBSCRIPTION);
messages from subscription returns the updated data through websocket. so, use the data in react render for real time data.
import React, { useState, useEffect } from "react";

import { Box, Flex, Input } from "@chakra-ui/core";

import ChatItem from "../ChatItem";

import { useMutation, useSubscription } from "@apollo/react-hooks";
import { gql } from "apollo-boost";

const MESSAGES_SUBSCRIPTION = gql`
  subscription {
    messages {
      id
      text
      users {
        id
        name
      }
    }
  }
`;

const SUBMIT_MESSAGES = gql`
  mutation InsertMessages($text: String!, $userid: Int!) {
    insert_messages(objects: { text: $text, created_user: $userid }) {
      returning {
        text
        created_user
        users {
          name
          id
        }
        id
      }
    }
  }
`;

const Chat = () => {
  const [state, setState] = useState({
    text: "",
  });

  const [insert_messages, { returnData }] = useMutation(SUBMIT_MESSAGES);

  const {
    loading,
    error,
    data: { messages } = [],
  } = useSubscription(MESSAGES_SUBSCRIPTION);

  const onInputChage = (e) => {
    setState({ [e.target.name]: e.target.value });
  };

  const onEnter = (e) => {
    if (e.key === "Enter") {
      let user = localStorage.getItem("user");
      user = JSON.parse(user);

      insert_messages({ variables: { text: state.text, userid: user.id } });

      setState({ text: "" });
    }
  };

  return (
    <Box h="100vh" w="40%" margin="auto">
      <Flex direction="column" h="100%">
        <Box bg="blue" h="90%" w="100%" border="solid 1px" overflowY="scroll">
          {messages &&
            messages.map((message) => {
              return <ChatItem item={message} />;
            })}
        </Box>
        <Box bg="green" h="10%" w="100%">
          <Input
            placeholder="Enter a message"
            name="text"
            value={state.text}
            onChange={onInputChage}
            onKeyDown={onEnter}
            size="md"
          />
        </Box>
      </Flex>
    </Box>
  );
};

export default Chat;
ChatItem.js
import React from "react";

import { Box, Flex, Avatar, Heading, Text } from "@chakra-ui/core";

const ChatItem = ({ item }) => {
  return (
    <Box h="60px">
      <Flex direction="row" alignItems="center" height="100%">
        <Avatar size="sm" padding="4px" marginLeft="10px" />
        <Flex direction="column" margin="5px">
          <Text fontSize="xl" margin="0">
            {item.users.name}
          </Text>
          <Text margin="0">{item.text}</Text>
        </Flex>
      </Flex>
    </Box>
  );
};

export default ChatItem;
Summary
So far, we have seen an application development using Hasura and Postgres on backend with React GraphQL and Apollo for front end.
In the upcoming article, we will see how to build a paginated api in Hasura and apollo react hooks and Infinite loader in react application. So stay tuned.
Until then, Happy Coding :-)