Building an App with firebase and react hooks in simple way
Building an App with firebase and react hooks in simple way
This article is going to be a complete tutorial about Building a Note application with firebase and react hooks.
Recent Articles,
Building Bookmark Manager using nodejs and mysql
Building a Piano with React Hooks
Table of Content
- Recent Articles,
- Table of Content
- Firebase Setup
- Integrating firebase and react hooks
- Developing Note Application with Firebase and Reack Hooks
- Summary
If you are completely new to react development, checkout this course from wesbos.
Well. It’s Demo time..
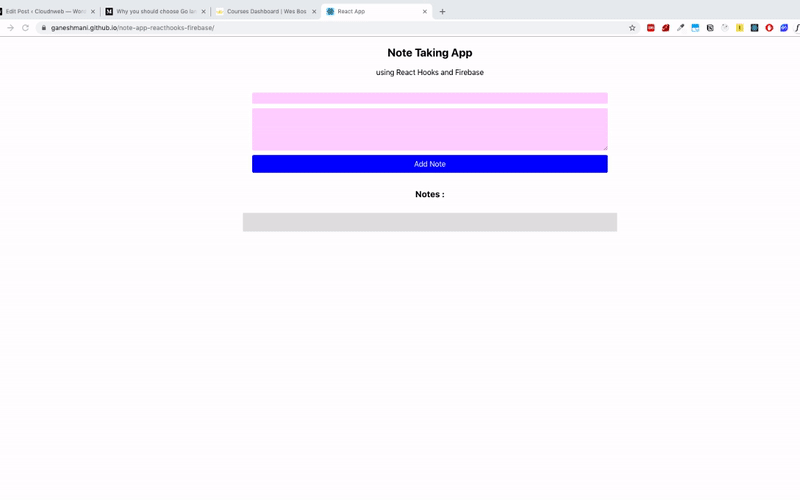
Let’s how to build one something like this using firebase with react hooks.
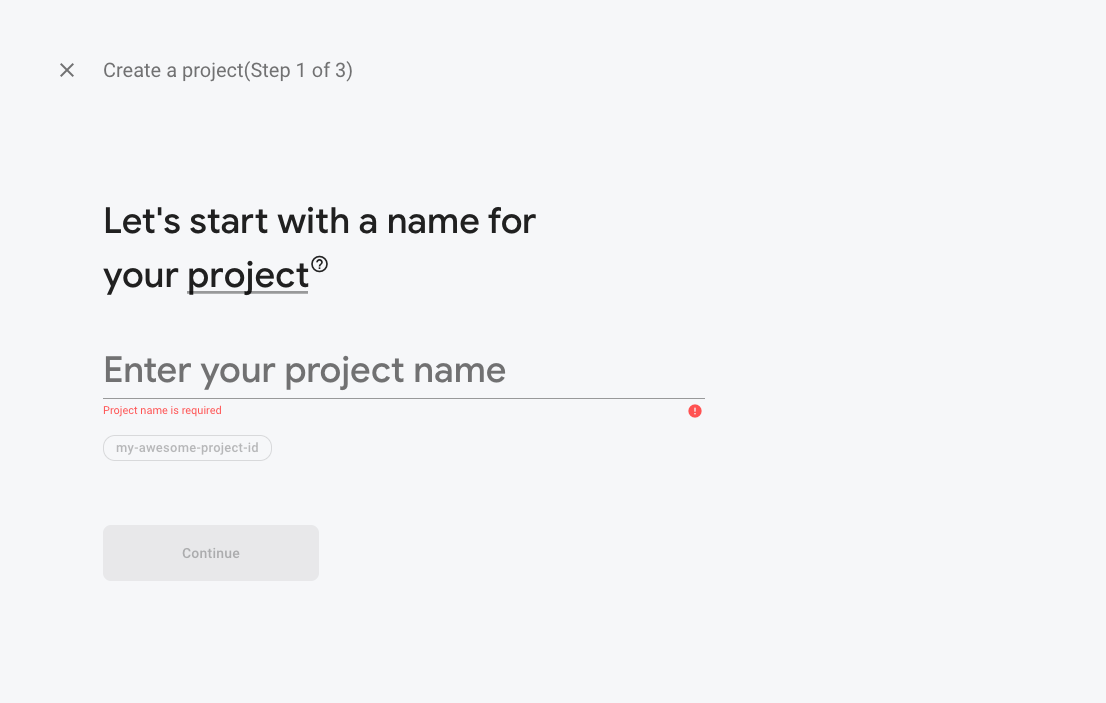
Firebase Setup
Firstly, we will setup firebase and get the credentials for our application.
goto Firebase and create a project
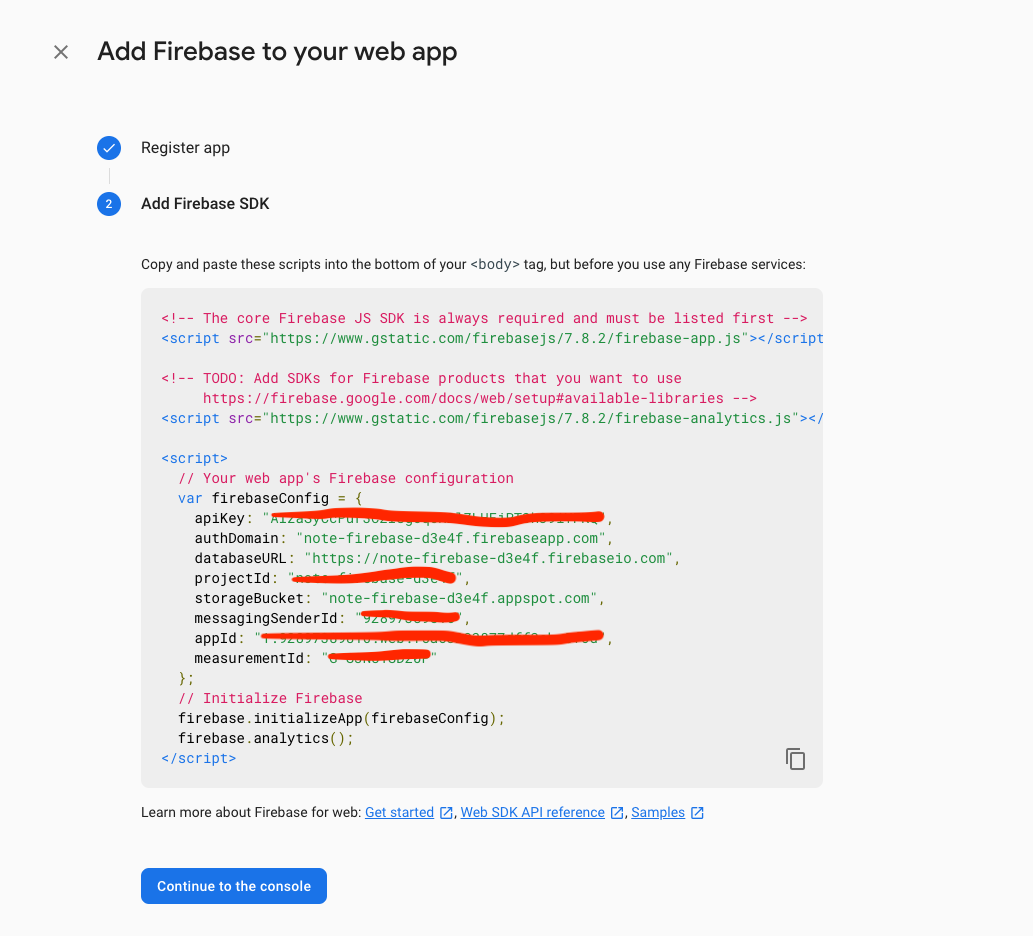
Click on Web to get the credentials for the project

Integrating firebase and react hooks
create a react project using create-react-app command,
npx create-react-app note-firebase
npm i firebase styled-components
After that, create a file firebase.js and add the firebase credentials
import firebase from "firebase/app";

import "firebase/firestore";

const firebaseConfig = {
  apiKey: `${process.env.APIKEY}`,
  authDomain: `${process.env.AUTH_DOMAIN}`,
  databaseURL: `${process.env.DATABASE_URL}`,
  projectId: `${process.env.PROJECTID}`,
  storageBucket: `${process.env.STORAGE_BUCKET}`,
  messagingSenderId: `${process.env.MESSAGE_SENDER_ID}`,
  appId: `${process.env.APP_ID}`,
  measurementId: `${process.env.MEASUREMENT_ID}`,
};
// Initialize Firebase
firebase.initializeApp(firebaseConfig);
// firebase.analytics();

export default firebase;
you might be wondering where do we set the environment variable, let’s do that process,
npm install env-cmdenv-cmd is used to set the environment variable in react applications. Then, add that in react scripts.
"start": "env-cmd -f .env.development react-scripts start",Note: Don’t forget to create .env.development file and add the credentials.
Developing Note Application with Firebase and Reack Hooks
We will be using styled component for React Components. If you are new to the concept of styled component, checkout this article
Firstly, to check firebase is working correctly with react. let’s connect it in the App.js to use firebase with react hooks.
import React from "react";
import "./App.css";

import firebase from "./firebase";

function App() {
  firebase.firestore().collection("notes").add({
    title: "Working",
    body: "This is to check the Integration is working",
  });
  return (
    <div className="App">
      <h2>Note Taking App</h2>
      <p>using React Hooks and Firebase</p>
      <h3>Notes : </h3>
    </div>
  );
}

export default App;
it will insert the data into the notes collection. let’s check whether it’s working properly by running the command,
npm run start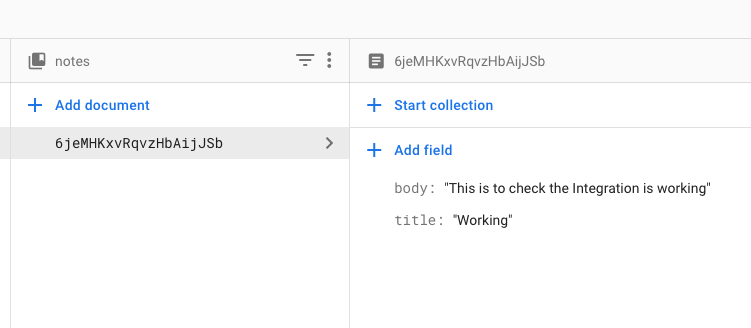
Woohoo..it’s working. Let’s see how to implement it in our components.
create two files AddNote.js and NoteLists.js where AddNote is to Handle the logics for adding a note.
Whereas, NoteLists handles all the list items of notes.
AddNote.js
add the following code in AddNote.js
import React, { useState } from "react";
import styled from "styled-components";
import firebase from "./firebase";
const AddNoteDiv = styled.div`
  display: flex;
  width: 40%;
  flex-direction: column;
  margin: 30px auto;
  padding: 5px;
`;

const InputTitle = styled.input`
  padding: 0.5em;
  border: none;
  background: #f4f4;
  margin-bottom: 10px;
  border-radius: 3px;
`;

const BodyTextArea = styled.textarea`
  padding: 0.5em;
  border: none;
  height: 80px;
  background: #f4f4;
  margin-bottom: 10px;
  border-radius: 3px;
`;

const Button = styled.div`
  background: blue;
  color: white;
  font-size: 1em;
  padding: 10px;
  cursor: pointer;
  border-radius: 3px;
`;

const AddNote = () => {
  const [title, setTitle] = useState("");
  const [body, setBody] = useState("");

  const addNote = () => {
    firebase.firestore().collection("notes").add({
      title,
      body,
    });

    setTitle("");
    setBody("");
  };

  return (
    <AddNoteDiv>
      <InputTitle value={title} onChange={(e) => setTitle(e.target.value)} />
      <BodyTextArea value={body} onChange={(e) => setBody(e.target.value)} />
      <Button onClick={addNote}>Add Note</Button>
    </AddNoteDiv>
  );
};

export default AddNote;
Here, we create text area and text input and store those values in react state using useState Hooks.
Once the user Clicks the Add Note button, we send those state values to firebase.
NoteLists.js
import React, { useState, useEffect } from "react";
import styled from "styled-components";
import firebase from "./firebase";

const ListsDiv = styled.div`
  width: 40%;
  height: 100%;
  background: #dedede;
  margin: 30px auto;
  padding: 20px;
`;

const ListItemDiv = styled.div`
  background: #b2c4db;
  border-radius: 5px;
  position: relative;
`;

const ListTitleDiv = styled.div`
  font-size: 24px;
  color: black;
  font-weight: bold;
  margin: 3px;
`;

const ListItemDetailDiv = styled.p`
  font-size: 18px;
  color: black;
  margin: 3px;
  max-height: 80px;
  overflow: auto;
`;

const ListItemDeleteButton = styled.button`
  border-radius: 5px;
  background: #c26c61;
  color: white;
  position: absolute;
  width: 15px;
  height: 15px;
  top: 5px;
  right: 10px;
  outline: none;
`;

function useLists() {
  const [lists, setLists] = useState([]);

  useEffect(() => {
    firebase
      .firestore()
      .collection("notes")
      .onSnapshot((snapshot) => {
        const lists = snapshot.docs.map((doc) => ({
          id: doc.id,
          ...doc.data(),
        }));

        setLists(lists);
      });
  }, []);

  return lists;
}

const NoteLists = () => {
  const lists = useLists();

  const handleOnDelete = (id) => {
    firebase.firestore().collection("notes").doc(id).delete();
  };

  return (
    <ListsDiv>
      {lists.map((list) => {
        return (
          <ListItemDiv>
            <ListTitleDiv>{list.title}</ListTitleDiv>
            <ListItemDetailDiv>{list.body}</ListItemDetailDiv>
            <ListItemDeleteButton onClick={() => handleOnDelete(list.id)} />
          </ListItemDiv>
        );
      })}
    </ListsDiv>
  );
};

export default NoteLists;
Here, you might be wondering what is a useLists. you might have not seen something like this in React Hooks. well, it is a custom hook.
Why we need a Custom Hook?. That’s a good question to ask. Before Hooks, if we want to share the stateful function or logic. we either use Render Props or Higher Order Components.
After Hooks, we tend to use it for all our component development. How can share a stateful function which uses Hooks. There comes the concept of Custom Hooks.
Custom Hooks is a function whose name starts with use keyWord and it may call other Hooks
Note : use KeyWord is for understanding purpose.
Like we said, Here useLists is a custom hook which calls the useState and useEffect.
Everytime data is added in the firebase, useLists hooks will be called to update the list state.
App.js will be like
import React from "react";
import AddNote from "./AddNote";
import NoteLists from "./NoteLists";
import "./App.css";

function App() {
  return (
    <div className="App">
      <h2>Note Taking App</h2>
      <p>using React Hooks and Firebase</p>
      <AddNote />
      <h3>Notes : </h3>
      <NoteLists />
    </div>
  );
}

export default App;
Complete Source code can be found here
Summary
This article explains how to get started with firebase and react hooks. We will come up with some advanced Concepts in Firebase and React Hooks using a real time example in upcoming articles.
Until then, Happy Coding :-)